Showing posts with label masculine. Show all posts

Thursday, November 5, 2020

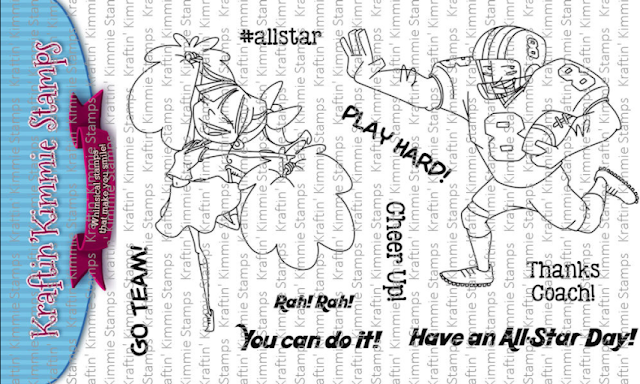
Kraftin' Kimmie Stamps - Allstar


I am not a huge sports fan however I know people who are and this great stamp set is a winner. I enjoyed coloring this card so much and really love how it came out. The set is by Kraftin' Kimmie Stamps and is called - Allstar. 


Copic Color Charts
Football - E13 E15 E19  /  N0
Skin - E00 E01 E02
Eyes - Black E44
Grey - N3 N4 N5
White - N0
Orange - YR04 YR19 E08


For the base I covered the top half using a fun black and words sheet I found in the 6x6 paper pad by Pebbles - Jen Hadfield  called Cottage Living.

For the bottom half I used the black and white triangles from the 6x6 paper pad by Project Life - Becky Higgins - High Five Edition.

I used a lighter orange then the markers so the image would pop, and I cut a piece  approximately 2 inches thick for the mat around the image. I added foam to it and adhered the piece to the bottom of the card leaving 1cm of the triangles showing. I then cut the image out by drawing 2 lines across the page omitting the football player and fussy cut the lines up to the football player and then around the payer and back to the opposite end of the line. I adhere the stamped image onto the orange mat approximately 1/4 inch from the top edge. 


I found the 2 sentiments ( You are so wonderful and Make a wish) as well as the arrow in the 6x6 paper pad by Kaisercraft called Daydreamer. This paper pad is really great and I use it time and again. I added a mat using the same orange cardstock and adhered to the card adding foam under the "You are so wonderful) and the overhang of both of the other two.


I finished of the card using XOXO stickers I found in Heidi Swapp's enamel sticker sheet - 312577.


Please be sure to subscribe to my blog 

Follow me on Instagram

Subscribe to my youtube channel


Happy Crafting  :)

Angie


Wednesday, January 2, 2019

Warm and Cozy Birthday His and Hers


                                                                                                                                                                                                                                                                                              These cards were both made using the same dies and format except the his and hers colors and glasses. The base I made was white 110lb coverstock top folding 4 1/4" x 5 1/2".  I then used the same 110lb coverstock and cut  3 times per card the circles die from Your Next Stamps Die called "Circle Panel Die". I layered the die cuts and glued them together. I like to layer dies to give the effect of a chipboard.

                                                                                                                                                                                                                                                I chose the green chevron page for the masculine card and a pink chevron page for the feminine card from the My Favorite Things 6x6 called Calm & Cozy Chevron. I cut each of these to measure 3 3/4" x 5 1/8". I pasted these to the card base for each card and then adhered the circle panel die cuts. I then used a grey card stock for the masculine and a red cardtstock for the feminine and cut out a panel of each and kept only a few on the circles. I pasted the circles inside the holes. 

I used dies to cut out the 2 pairs of glasses using the same grey and red cardstock respectively. I then used the spellbinders D-Lites Hipster die set to create the coffee cups.Using 110lb white coverstock I die cut  2 cups per, 2 cup coffee lids I then cut 2 coffee cozies per using brown craft paper. I pasted the individual items together and colored them individually before pasting them into the little figurines. 


Copic Color Chart:
Lid: E40 E43
Cup: E44 E47 E49
Cozy: little vertical lines E47


I cut the sentiment mat using Avery Elle Double Pierced rectangles die. I used the 2 3/4" x 1 1/2" die. 


                                                                                                                                                                                                                                   I stamped the sentiment using the Sunny Studios Quilting Hexagons stamp set. I used Stampin' Up Cherry Cobbler for the feminine card and Basic Grey for the masculine card. 


To finish the cards I used black half pearls for eyes and I used Wink of Stella in clear for the feminine glasses and cut tiny lips for her as well. 


Please be sure to subscribe to my blog 

Follow me on Instagram

Subscribe to my youtube channel


Happy Crafting  :)

Angie

Tuesday, December 18, 2018

Penny Black - Life is Simpler


This masculine card was made using the slapstick/Cling stamp by Penny Black - Life is Simpler. 


The image was stamped on white 110lb cardstock and then colored.


Copic Color Chart
Tractor: R29 R37 R39
Tires: N4 N6 N7 N9 N10
Rims and axel support : N0 N2 N4
Lights: Y11 Y02 
Shirt and Hat: B21 B23
Pants and Hair : E23 E25 E27
Skin: YR000 YR00 E02

 I stamped the image a second time on Inkadinkadoo Stamping Mask Paper. I then fussy cut the image as closely as possible , covered the colored image and used Tim Holtz distress ink for the sky and ground. To create the glowing line I covered the sky with a fussy cut piece to create the ground line... I used the opposite piece moving it down a bit to then blend the sky and kicked up dirt.

I cut then cut the the image 4 1/8" by 5 3/8". I cut red card stock just shy of 4 1/4" by 5 1/2". 

I used a "happy birthday" sentiment stamp and created a border using a slightly larger piece of red card stock. I added foam and adhered to the card base. I added a tiny wood piece. 

Please be sure to subscribe to my blog 

Follow me on Instagram

Subscribe to my youtube channel


Happy Crafting  :)

Angie

Thursday, December 13, 2018

Kraftin' Kimmie Stamps - What's Up, Dude?


I love a great "man card" and the masculine stamps are so hard to come by so I was really glad to find and snag this one. I was saving the perfect pizza paper for just the right occasion.

For this card I first stamped the image on white 110lb cover stock 3 inches by 4 1/4 inches.


I used the following colors:
Copic color chart:
Skin : E00 E01 E02 E04
Shirt: R32 R29 R59
Shorts and Skate Board : N4 N6 N7 N9 N10 
Skateboard texture - 0
Shoes and Hat : YG03 YG05 YG06
Socks : C1 
School Bag : E40 E43
Hair : N6 N7 N9 N10
Ground : C1 C3     


I cut a black piece of card stock 3 and 1/8 " by 4 and 3/8". Pizza piece of patterned paper is 4 and 7/8" by 3 and 1/8". I also used a piece of black card stock to add a border to the patterned paper, which is cut to 5" by 3 and 1/4"

I cut bright neon green paper 4 1/4" by 5 1/2" from Forever in Time -Tropical 6x6 Select Cardstock paper


I used White - Yeti Lawn Fawn pigment ink pad - to stamp the Happy Birthday sentiment on a piece of 2 and 5/8" by 3/4" black cardstock. I used black foam to add height to this piece.

Lastly I glued black half pearls to a portion on the card surrounding the image.


Please be sure to subscribe to my blog 

Follow me on Instagram

Subscribe to my youtube channel


Happy Crafting  :)

Angie


Kraftin' Kimmie Stamps - Something Yummy Challenge!!!

Good morning and welcome to another fabulous and fun Saturday Challenge at Kraftin' Kimmie Stamps! https://kraftinkimmiestamps.blogspot....